SharePoint 2010, Office365: Change the Field Used for Item Menu Dropdown

This question was posted on the forums this week and it got me thinking about some common tasks that I do often. I wanted to just put together a quick post to outline my process.

Here is the business problem we are looking at:


Is it possible to change the field in the list that is the default for the List Item Menu?

The quick answer is that when a new list is created the edit menu for the list items is associated with the Title field. This is not something that can be reconfigured for the list. What you can do however, is create custom list views that allow you to assign the edit menu to other list columns. In this blog post, we will be walking through those steps for a task list.

To get started, access a SharePoint task list. Notice that by default the item drop down menu is associated with the Title Column.


For the purpose of our example, let’s assume we want the drop down to instead be associated with the status column (note: we could have selected any column). To accomplish this, we will need to modify this list view using SharePoint Designer. We can quickly open this list in SPD using the shortcut on the List Ribbon:


When we select this menu option, SPD will open to the specific list that we are working with. From this screen we will be able to access and customize the view settings. In our example we will want to select the All Tasks view.


You will see within SPD that the view will load and look very similar to what you see in the browser.


We would like to add the List Item Menu to our status column. We do this by selecting the value for the status and then selecting the menu. Once the menu is expanding we see an option to “Show List Item Menu”. When we select this we are configuring the view so that the status column is able to display the dropdown.


Once your updates are done, select the option to Save (disk icon in top left corner), and then return to the browser view of the list. You will notice that the Status column now has the item level dropdown associated with it.


This operation is typically done whenever you have a list where the title field doesn’t provide a descriptive value and in most cases you would like it to be hidden from the default views. This functionality will allow you to hide the title field and then associate the menu drop down with other list columns.


#Office 365, #SharePoint 2010 : Creating New Excel & PowerPoint Files from the New Menu Dropdown

This question was posted on the forums this week and I wanted to take a few minutes and map out the process so that others who are just getting started would have some steps to follow.

Here is the business problem we are looking at:


In SharePoint online when I click on new document I only get an option to add a word document.  Shouldn’t there be an option for excel and PowerPoint as well?  I can add one if I create it with the real office client, but I want to create it in the browser.  Is this possible?

Basically, what we want is for our users to be able to easily create new PowerPoint or Excel documents from a document library.


In SharePoint this is accomplished through the use of Content Types. If you want to read up on content types, I suggest you look at these two links to get started.

Through the rest of this blog I will be completing the steps to solve the very specific question above. Content Types are very powerful however, so use this blog post as a way to get familiar and then hopefully continue to develop custom content types for your organization.

Step 1: Create the two Content Types

For each content type we create we can associate a custom template. In our example we will be creating a custom excel template and a custom PowerPoint Template.

  1. Open the desired application and build your templates. Save the templates in a location you can reference them later. In our example, our templates will be empty.


  2. Now, we will need to create the content types in SharePoint.
    1. Access the Site Settings Menu


    2. Open the Site Content Types Gallery


    3. Create a New Content Type


    4. When you select OK you will be taken the management screen for the content type. On this screen click the link to open the advanced settings.


    5. On this screen we will associate the Custom Template with the Content Type. We do this by uploading the template we created in step 1.


    6. Now, repeat step 2, this time for the PowerPoint template.

Step 2: Associate the Content Types with the Library

Now that our content types are ready, we need to associate the Content Type with the Library we are using. We do this by accessing the Libraries Settings Page.

  1. Go to the List Settings Menu


  2. Open the Advanced Settings for the List.


  3. Allow the List to Use Custom Content Types


  4. Once you do this, you will see a new section called Content Types on the List Settings Page. From this section, we will add the Custom Content Types to the List.


  5. Now, when you access your document library you will see that you have 3 templates available.


#SharePoint, #Office365 : Let’s Talk about Community!

This afternoon @CMSWire posted an article about the SharePoint Community and what it means and what it looks like. For this article they interviewed a few people in the community and along with @wonderlaura (Laura Rogers), @meetdux (Dux Raymond Sy) and Chris Johnson (@loungeflyz) I was asked to give my feedback about the SharePoint community. The article turned out great and I think it gives a good perspective to the SharePoint community.

There are so many different types of communities that you can be involved it. Personally, I tend to focus on the following:


Community: What I use it for: How to Join Me:
Twitter Staying in touch! This is my go-to location to see what everyone is up to. I see what new blog post are out and I see what people are working on. This is by far the thing that keeps me most connected to the community. @jennifermason
The Grid This is a new community focused around Office 365. It is a location for others who are working with Office 365 to share ideas and work together. You have to apply for this community, but if you are an Office 365 guru you definitely should look into it! Get on The Grid
BuckeyeSPUG This is one of my FAVORITES This is the local SharePoint user group in Columbus Ohio. We meet once a month and of course have a SharePint as well! We get together to hear more about different topics and points of interest and we also spend time discussing what we are up to and what things we are focused on. http://www.buckeyespug.com
MSDN Forums This is where I try to really give back to the community. I try to respond to 1-2 items a day, but this can at times be hard based on other factors. I may miss a few days here or there, but I still consider this one of my strong connections to the SharePoint community. SharePoint 2010 Forums

These are just the primary locations where I am actively involved and it by no means represents an exhaustive list! There are so many great ways to get involved in the community beyond what I have mentioned. The key is that you find what works for you and run with it. I’d love to hear from others on their thoughts on community, so please post comments to either the article referenced above or this blog post so we can discuss!

#Office365 – Public Website vs Private Site Collection

I have had this conversation a few times lately so I wanted to take a few minutes and put together a quick blog post that helps define the two categories of site collections you can create in Office 365.

Public Website

This category of site collection is your public website, your way to present your company data to an anonymous audience. This site collection is created one time for each tenant and is the only site collection that supports anonymous access. When you create this site you will see that it comes pre-configured with several common pages that would likely be present on a company’s public website.


This site is really pre-configured as a starting point for you to take and enhance with your own content. While this site is a SharePoint site, it is a special type of SharePoint site with a different subset of features. This means that you will work with this site differently than you will interact with Private Site Collections. For instance, instead of creating lists and adding web parts to this public site collection you will edit pages and add Gadgets. As you can see in the screenshot below, the interface is similar to a standard SharePoint site collection, but has some differences. If you are familiar with working on SharePoint sites you should be able to pick up on how to customize this public site very easily. Things will be a little different, but the changes should be obvious and easy to pick up on.


Private Site Collections

This category of site collection is where you are interacting and collaborating with others. Anyone who accesses these sites must do so with a username and password. No anonymous access can be configured for this category of site collections. If you are used to working with SharePoint on premise this is what you would expect when creating new site collections.


Each tenant can create multiple private site collections and then invite named users to access the created site collections. When you create the site collections you will be able to configure the properties for that particular site collection.

SharePoint 2010: Filtering a List Web Part by Selecting a Shape within a Visio Document

In this blog post I wanted to cover the concept of using a Visio Diagram shape to filter a SharePoint list. In my scenario, imagine that you have a Visio document that maps out a specific process. For each step in the process there are different documents that need to be referenced. We want to create a simple page that users can access to see the process and to locate the required documents for each step in the process.

To get started we will need to have 3 different components:

  1. A list within SharePoint that contains the information about the process step.
  2. A diagram in Visio that is linked to the SharePoint list.
  3. A SharePoint Document Library that has a lookup field that references items in the list used for step 1.

Our 3 lists will be linked together based on the process information list. Our Process list is our primary list. The Visio document and the associated documents list will both link to items in the process list. This linking will provide us with a way to filter the data. We are able to create this connection using the lookup feature within SharePoint and the Visio features to connect a diagram to SharePoint list data.

For my Process list I have just created a simple custom SharePoint list. My list is based off of the Custom List template and uses the default Title Column and a multi-line column called Description.


For my Visio Diagram, I started with a simple diagram that outlines my process. A screenshot is provided below:


Once I had the diagram as I needed I selected the Data Ribbon so I could connect this diagram to an external data source (the list I created in step 1).


Selecting the Link Data to Shape opens a window that allows you to configure your data connection. In our example we are going to connect to the SharePoint list we created in step 1.


If you follow the wizard you will first need to select your SharePoint site and then you will need to select the specific list to connect to:


Now that our list items are displayed in data window, we will take each process item and associate it with a step in our process diagram.


We will need to repeat this step until all the shapes in the diagram are linked to the items in the SharePoint list.

Next we will need to create our library and add a column that links back to the same list of procedures that we linked the diagram to in the previous step. Here is a screenshot of the library. I have created one lookup column.


Now that we have the content configured we will be creating the display. For this I am going to create a page in the Site Pages library and then add two web parts to the page. Once both web parts are added, I will use a web part connection to pass data from the Visio Web Part to the Shared Documents web part.

For my Visio Web Part I will use the web part toolbar to configure the link to the published diagram and I will also set the properties to configure a custom height and width. Below are some screenshots of the configuration:


In addition to this, I need to configure the web part so it can use additional information in web part connections. In Visio when we added the connection to the list, we added the ID column to the shape data (this happened automatically as we linked the data shapes). We want to use this column as our connection so we need to configure the web part. This is done by adding ID to the tool pane option for exposing properties.


Once we complete the configuration and save the page you should see something similar to the screenshot below.

Next, I will add the document library we created in the steps above.


Now we just need to add a connection between the two web parts. This is done from the drop down menu of the Visio web part:


Then we will set the web part to Get Filter Values from:


And then we will need to connect ID from the Visio Diagram to the Process we linked to for the Associated Documents Library:


Once the configuration is in place, when you select a shape in the Visio Diagram it will filter the documents list to only show associated documents.


In this blog post we just looked at a simple example of linking content between a Visio diagram and different libraries. When you take this example and scale it out to larger business solutions you will be able to quickly see some of the benefits that are available by combining just a few out of the box tools! I’d love to hear about how you are using this type of solution, so please leave comments so we can see other examples!

SharePoint 2010 – Suggested Content Browser Locations

One of the Site Collection settings you can configure in SharePoint 2010 is the “Suggested Content Browser Locations”. When configured, these locations will be displayed as a dropdown when you users select to add content from SharePoint. Keep in mind that publishing must be enabled for this option to be available within the site collection.

The steps to configure this are described below:


When the list loads, select the option to create a new item.


Now when a user selects the Insert Option – Picture -Insert from SharePoint they will see this link as a suggested location.


SharePoint 2010 – Office 365- Using InfoPath to Build a List Summary Web Part

Have you ever wanted to show some summary information about a list, such as counts and totals for the entire list? This request has come up at least twice in the past few weeks on the MSDN blogs, so I wanted to create a blog post that shows a quick example of how you could solve this problem using InfoPath. Here is an example of one of the requests: http://social.technet.microsoft.com/Forums/en-US/sharepoint2010general/thread/d2c07b63-fd4e-4a77-a506-2c52e144dd30

There are a few different ways that this can be accomplished, one way is to create a custom list view in InfoPath and then use the Form Web Part to display the data

Start by configuring your list in SharePoint. Once that is ready you will want to customize your list form using InfoPath Designer. Once you have the form opened in SharePoint Designer, you will want to create a new view:


This will give us a blank view to work with and will not have any impact on the current new and edit forms. In my example I am going to call the View “List Summary”.


Now we will need to create a data connection to our list. This will allow us to see our list as a whole. By default we have a connection to just the list item, but since we want to get a summary we want to look at a data source that contains all the list items. We are basically creating a data source to retrieve data from our current SharePoint list.


Select our list (for my example I am using the task list):


Select the fields that you will pull over:


Name the data source:


Now we are ready to build our form. I have created just a few fields to show the sum of the number of items and the number of closed or open items. You would just customize this to match what you were looking to display.


The next step is to populate the fields we created. For the Total Number of Tasks, we are going to set the field using the Count Function. You do this by right clicking on the field and selecting the Text Box Properties:


Now, select the Function icon next to the Value field. This will allow us to configure the value that is loaded by default when the form is loaded.


Select to Insert Function:


Select the Count Function:


When the function is displayed, select the option to double click and insert the field. In the Field or Group selection screen, select the data source we created above. Within that data source select the Title field. This will give us a count of the number of items in the list. Once you do this select OK until you are back at the form.


Now for the next field (Number of Completed Items) you will complete the same steps, but on the final step where you are selecting the field you will also add a filter.


Once you get the form completed (and published to the list), you can add it as a web part to any SharePoint page.


In the properties pane of the web part, configure the list and the view that you created above:


Now when the page loads you will see your summary view displayed as a web part:


Because the summary web part is not directly related to the list web part on the page they can both have a different focus. This means that I can create a custom view on the page that filters the data as well as show this summary that could apply to all content in the list.

SharePoint 2010, Office 365: Reusable Workflows associated with Published Content Types

On a recent project we have had the need to create a workflow that is associated with a content type. This content type is published globally and then used by all site collections in the farm. The new content type publishing features in SharePoint 2010 will get us half way there. Using these features we can publish our content type, however our workflow will not publish with the content type. This means that we need to come up with an alternate approach to making the workflow available.

Now, this is where we begin to have several options, and each option has pros and cons. For the purpose of this blog post I am going to be walking you through the process of creating the workflow in SPD, saving it as a template and adding it as a solution to the site collection where the content type is published. This is a manual step, so I understand fully that this might not work in all scenarios. Like all things SharePoint though, you will need to look at the pros and cons of each option and choose the one that best fits your scenario.

This Post Applies To:


Step 1: Create the Custom Content Type

For this step, we will need to access the content type hub. If you are you the server administrator then when you configured the Managed Metadata Service Application this is the same site collection you configured to be the hub. If you are not the server administrator then you will need to work with your SharePoint Governance team to determine your access to this location. Since this is a global location that effects the entire farm, it is very likely (or should be likely) that there are governance policies in place to identify who has access. Below is a screenshot that shows this configuration setting:


Once we know the URL of our content type hub, we will access this site collection and create the content type just like any other site collection.


For my example, I am going to create a Content Type Called Custom Document, with an associated Column called Custom Text.


Once we create the column, we will edit the properties so that it becomes a hidden field (hidden means that it will be available for views, but wont display on the create and edit forms).


Step 2: Create the Reusable Workflow

Now that we have the content type in place, we need to create our reusable workflow. For my example I am going to create the workflow from the content type hub site collection. My workflow is going to be pretty basic. Whenever a document is created it will be assigned a custom number based on the user and the created date. This is just an example to get you started. Any workflow that can be created as a reusable can be created in this step; I just want to keep it simple for this example.


In the workflows menu, select to create a reusable workflow:


Select the Custom Content Type that we created in the step above:


Add your workflow steps. In our example we are going to set the value of the column we created in the step above*. Once you have completed the changes, publish the workflow.


*Note: If you don’t see your custom column, edit your content type so that the field isn’t hidden. Set the value in the workflow and then reset the field to hidden.

Step 3: Save the Workflow as a Template

Navigate to the Workflow settings page and from the Ribbon, select the option to save the workflow as a template*.


*I recommend testing the workflow fully before completing this step. No sense in making a template before you know if it works or not

Once the template has been saved, you will see a message that tells you that the template has been saved to the site assets library.


Now, we will access the site assets library and export the .wsp we just created. When you select the export option, you will want to export to a location that we can access in the next step.


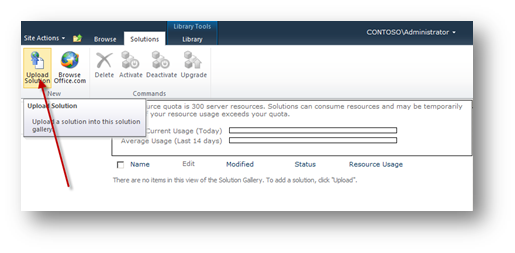
Step 4: Upload Solution & Activate Feature

Now we will need to return to the site collection that has the content type and upload our reusable workflow to the solutions gallery.


Upload and activate the solution file we saved in the previous step.


Activating the solution is just part of the process. The activation makes the workflow available, but in order to use the workflow we first need to activate the feature. We will need to access the site features and activate our custom workflow.


Step 5: Associate the Workflow to the Content Type

Now we will open the settings for our custom content type and add the workflow association.


Select the custom workflow from the options and enter the required information.


Step 6: Publish the Content Type

Now that our content type is ready to go, we will publish the content type. The publishing action lets the service application timer know that a new content type is ready to be pushed down the next time the timer runs. This typically runs every hour so keep in mind that it might not be immediately available in all the site collections.


Step 7: Add the Workflow Solution to the other Site Collections

Once the publishing timer runs, you should be able to access another site collection and see that your custom content type has been published. Since we haven’t yet installed the custom workflow, we will see the content type but will also see an error in the publishing log.

To access this information, select the Content Type Publishing option on the Site Settings Page-


You should see your custom content type displayed with the Subscribed Content Types.


When you select the link to open the error log, you should see an entry similar to the screenshot below. This is because the associated workflow is not activated within this site collection.


To fix this error, we simply need to upload the workflow solution to the site collection and activate the workflow feature. You can do this by repeating step 4 in each of the site collections that is going to use this workflow.


Yes, I know this is a very manual step! But that is why at the beginning of the blog I said you have other options (think custom development or PowerShell scripts – depending on your platform). The purpose of this blog is just to highlight the manual steps. Besides you can’t really know how to automate things until you fully understand how to do them manually.

Now, the next time the process runs you will not have an error in the log. You can now add the content type to the document library and once you upload a document the workflow should automatically start (it only starts automatically because I configured it to run when a document is uploaded, it will trigger based on your earlier configurations).


Differences between Platforms:
The process for completing the tasks manually between Office 365 and SharePoint 2010 is the same. When you start to look at ways that you can implement the workflow solution across many different site collections you will run into some differences on what is available as a tool. For instance, if I had to do this in a dedicated environment that had many site collections I would write a custom program or even a PowerShell script that would add my solution, activate it and then activate the feature on all site collections. However, with Office 365 I don’t have access to PowerShell so I wouldn’t have the same automation options.


SharePoint 2010 – Office 365 – Creating New Site Collections from a Template

Often times when you create a new top level site collection you want to use an existing custom site collection. This can easily be done from the new site collection.

First, create the site template from the current site that you are using that you would like to reuse as a template. Note: If you do not see the option to save the site as a template, this means that various features are activated that don’t support saving the site as a template. You would need to deactivate these features and try again.


Enter the needed information and select ok:


A message will be displayed informing you that your template has been saved to the gallery.


Click the link provided to access the solutions gallery. When the gallery loads, click on the name of the template you created and when prompted choose to save the file to a location you can reference later. (We will need to access this location when we use the template on our new site collection)


Now, when you create the new site collection in Central Admin, select the custom template called “Select Template Later…”. (If you have to request a site collection from another resource, be sure to specify that you want to use this template).


When you try first access the new site collection you will be directed to the template picker page. You will see all the available templates, as well as a link to the Solution Gallery. You will want to click on the solution gallery link.


Now we will need to upload our template we created above to the solution gallery. Once we upload and activate the file we will be able to select it as our template for the site collection.


When the solution is uploaded, you will see a dialog where you can activate the solution. Activating the solution will make it available as a site template.


Now, use the breadcrumbs to go back to the home page.


You should now see your template under the custom tab for site templates.


Office 365: Interface for Adding Web Parts

Once you start using Office 365 you will probably notice that the interface for adding web parts is different than in SharePoint 2010. No worries though, because the changes are good ones! Below are some screenshots that highlight the process for adding web parts to pages in Office 365.

First up- access the page where you want to add the web part and then select to edit the page.


Now, enter your cursor in the location where you want to add the web part.


Select the Insert Ribbon. There will be a group called Web Parts that displays several of the common types of web parts that you can insert on the page.


Notice that each of these has a drop down arrow. Selecting this arrow will allow you to see the existing list of that type or create a new list of that type.


If you want to add a web part that isn’t displayed on the main menu, then you can click on more web parts to see a list of all the web parts that can be added to the page. When you select the More Web Parts option a Silverlight application page will be displayed that allows you to select the web parts you want to add to the page. From this page you can either see all web parts, filter by category or search for specific web parts.